To disable delivery or freight options in an events page.
- Edit your events page, and click the SETUP tab top right, or the SETUP SHOPPING CART in the sidebar.
- From there CUSTOMISE DISPLAY OPTIONS found in the Display Options area.
Find the DISPLAY OPTIONS section and select CHECKOUT OPTIONS to jump directly to the checkout settings.
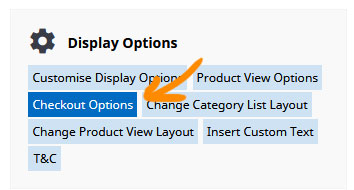
Change the Checkout Address Process to CHECKOUT BUTTON ONLY.

Setting a Short Customer Address
To require a minimal set of customer address information, change the Checkout Address Format to SHORT CUSTOMER ADDRESS

More From This Section
The events management system is an events calendar with an attached booking and shopping cart, suitable for managing, advertising and taking online bookings for upcoming events.
To add the Events Booking section to your site please log into the CMS and follow these steps
Understanding your way around the booking system
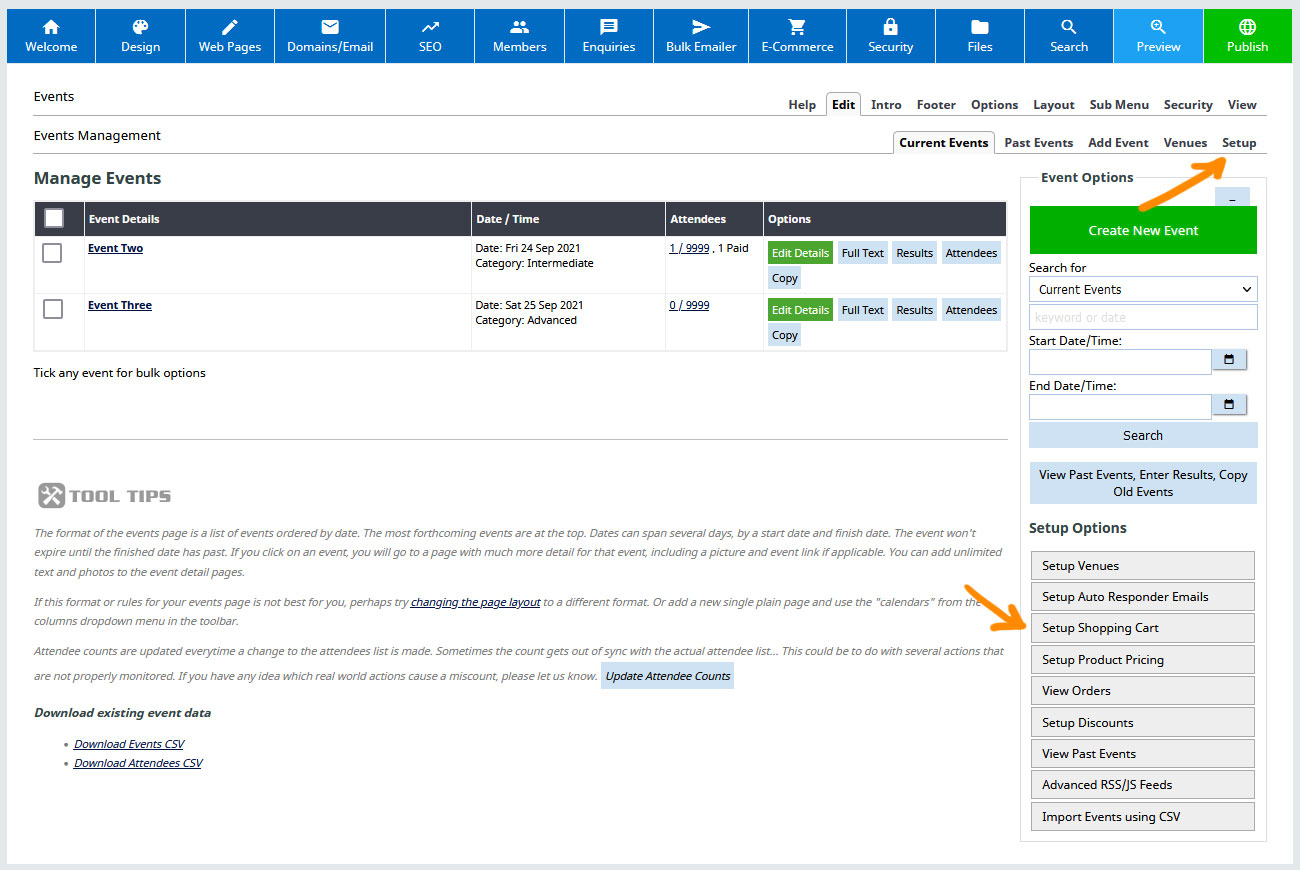
Learn how to add a new event within your Events Calendar.
You can specify a Webinar link and connection requirements as part of an event setup.
Learn how to create a venue for an event.
Setup your Shopping Cart and Create Event Products, Pricing, Tax Rates, and to View Orders
You can manage all events and attendees here.
Learn about styling your events and calendars and choosing which option to display on your website.
Events can be assigned to categories to allow your customers to filter the events shown.
When setting up paid events products you can disable delivery address and freight options
Customising who receives the event booking notification
You can automatically set non-bookable events to auto-repeat, and with Bookable events, duplicate the events for additional dates.
FAQ Topics
Building your site
Advanced Page Types
E-Commerce
- Shopping Basics
- Product Pricing, Currencies
- Category Management
- Products
- Product Options
- Layout and Formatting
- Payment Options
- Freight - Couriers
- Processing Orders
- Orders / Invoices
- Advanced Ecommerce
- Plugins
- Wholesale
- Bookings Management System
- Stock & Quantities
- Vouchers, Discounts, Loyalty Points
- Selling Photos / Prints
- Shopping Cart Add-on Page types
- Advanced APIs / Add ons
- Point of Sale (POS)
- Reports
Email & Membership
Promoting your site
Advanced
- Power User Options
- Form Spam Filtering
- Wordpress
- PHP Setup
- [TAGS]
- jQuery snippets
- Search External Links / Import external content
- HTML / CSS Snippets
- Embedding Web Fonts
- Loading additional Material Symbols styles
- FAQ Help Map
- Uploading local font files
- Advanced Template Customisation, CSS, etc
- Languages and Translations
- Importing Content from Another Platform