Using Contentbox to manage your banner content allows gives you access to all the formatting options available in the Contentbox Editor.
Enabling the Contentbox Banner option
- Click the DESIGN button, then click the BANNER IMAGE button found under the Personalise you Theme section.
- By default the simple banner option will be available, but click the EDIT BANNER USING CONTENT BOX button to enable the Contentbox Banner.

Click the Edit Banner Using Contentbox button to enable the Contentbox Banner.

This will load a default Caption Slider banner, which you can edit as needed - see help below:
Contentbox Editor areas
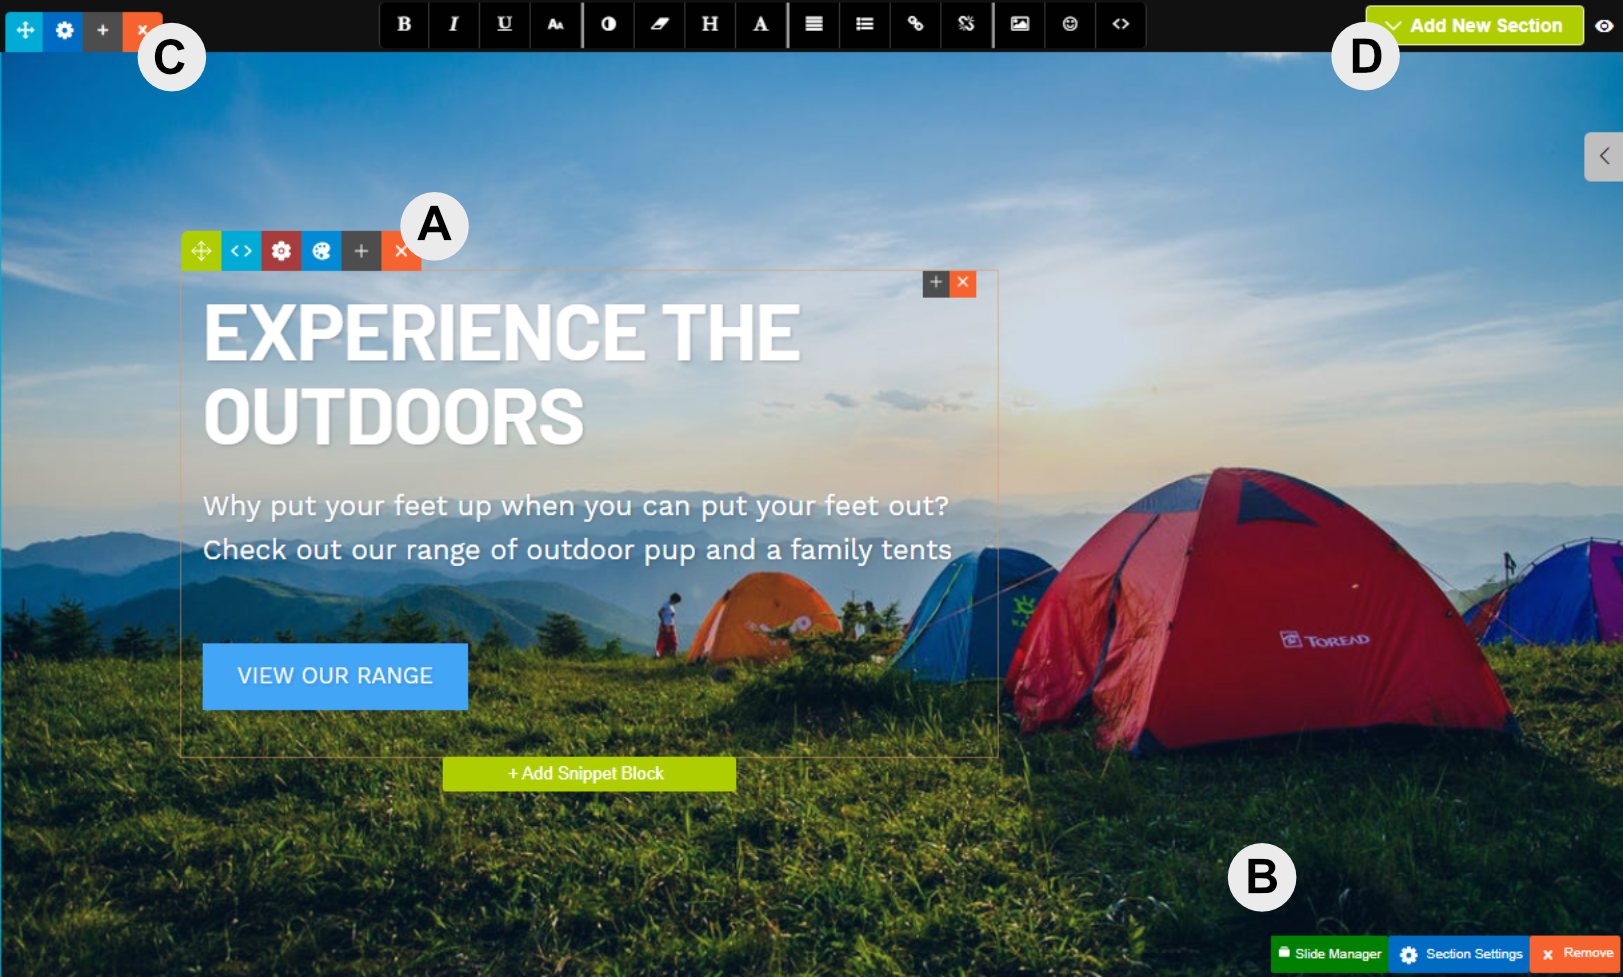
[A] Drag-Drop Snippet Block
Like all Contentbox sections, the caption content uses drag-drop snippet blocks added to the section. You can edit and style content the same way you would using the drag-drop editor.
You can use the Contentbox settings to set the width and alignment amongst other things.
[B] Contentbox Settings toolbar
Contains a Slide Manager popup which can allow you to quickly manage the amount slides, reorder, add new slides, replace the images and set the slider settings.
The Section Settings button launches the standard Contentbox Settings options, which also allows you to set the height of the section, content width, light text, content alignment, and other things. You can also use the BLUE COG at the top left to launch the section settings popup.
Remove will remove the current section.
[C] Contentbox Section toolbar
Allows you to move, change the section settings, duplicate the section and delete the section. See the Contentbox Introduction for more information.
[D] Add New Section button
Allows you add a new Contentbox section, if you want to change to a Multi Caption slider.
You can use any Contentbox section, not just sliders in the banner area.
The Contentbox editor used in the banners area is the standard banner area, all section types are available to be added.
There are two types of Contentbox caption sliders available

Single Caption Image Slider (Default)
Single Caption Image Slider (Default)
Allows multiple images to fade or slide, with a single caption overlaid.

Multi Caption Image Slider
Multi Caption Image Slider
Allows different captions to appear on each slide.
Deleting the existing slider section
To delete the existing section, click the orange X ICON top left of the section, or the orange REMOVE button at bottom right of the section.
Adding a new slider section (or any Contentbox section)
To add a new section, click the green ADD NEW SECTION button top left of the section, then choose your required section type.
Managing the slider settings
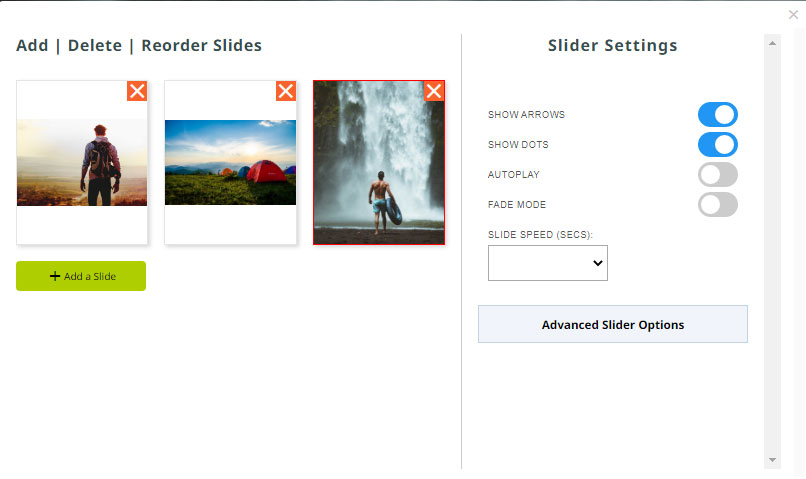
Managing Sliders via the Slide Manager button
Clicking the green Slide Manager button will launch the Slide Manager popup, which allows you to:
- Add new slides
- Remove slides
- Reorder slides via drag-drop
- Replace the slide images
- Set the slider settings
- Choose a FADE MODE style.
Managing the Contentbox section settings
To manage your Section settings, click the blog COG ICON top left of the section, or the blue SECTION SETTINGS button at bottom right of the section.
More From This Section
FAQ Topics
Building your site
Advanced Page Types
E-Commerce
- Shopping Basics
- Product Pricing, Currencies
- Category Management
- Products
- Product Options
- Layout and Formatting
- Payment Options
- Freight - Couriers
- Processing Orders
- Orders / Invoices
- Advanced Ecommerce
- Plugins
- Wholesale
- Bookings Management System
- Stock & Quantities
- Vouchers, Discounts, Loyalty Points
- Selling Photos / Prints
- Shopping Cart Add-on Page types
- Advanced APIs / Add ons
- Point of Sale (POS)
- Reports
Email & Membership
Promoting your site
Advanced
- Power User Options
- Form Spam Filtering
- Wordpress
- PHP Setup
- [TAGS]
- jQuery snippets
- Search External Links / Import external content
- HTML / CSS Snippets
- Embedding Web Fonts
- Loading additional Material Symbols styles
- FAQ Help Map
- Uploading local font files
- Advanced Template Customisation, CSS, etc
- Languages and Translations
- Importing Content from Another Platform