All sections can have a unique ID applied to them to allow a menu link to jump them down to the relevant section within a stack of contentbox sections.
How to add a unique ID to a Contentbox section
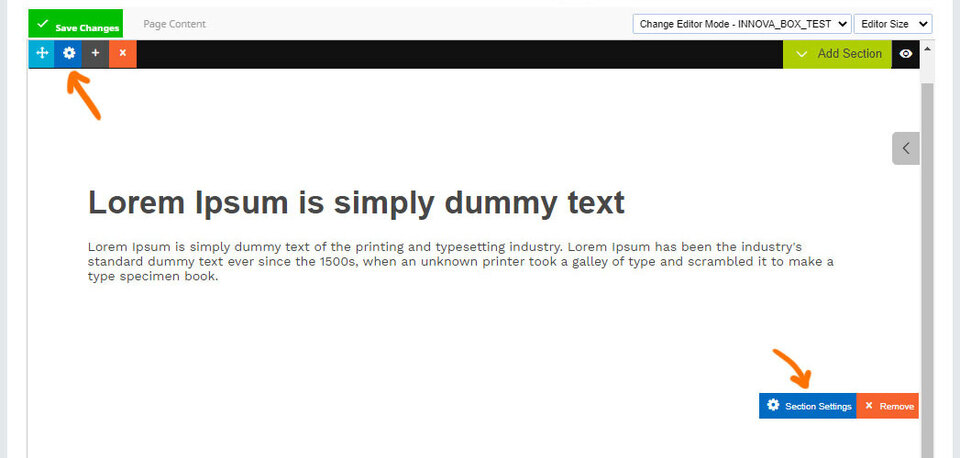
Click the Section Settings icon to bring up the Section Settings popup window.
Add your custom ID
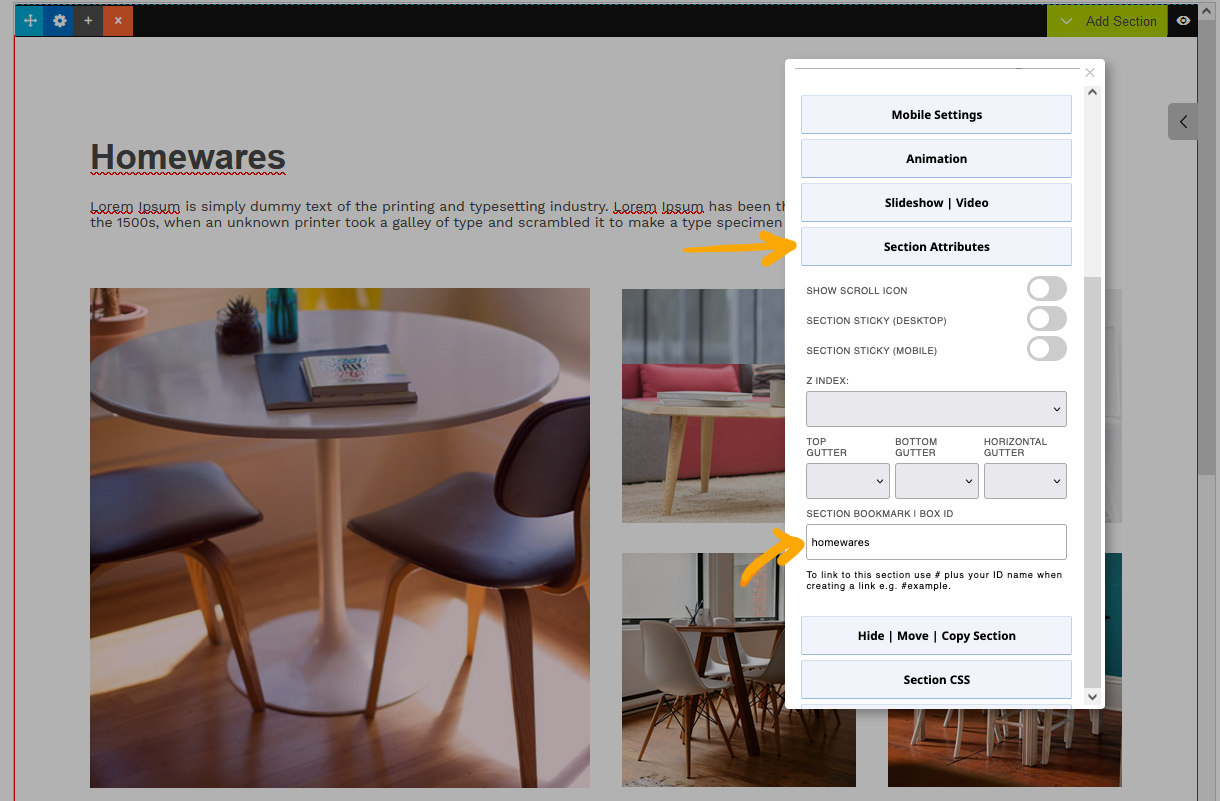
Click on the SECTION ATTRIBUTES panel to open the settings, then enter a unique custom ID name in the SECTION > BOX ID field.
This ID will then be used in the menu link to jump you down the page.
The ID should NOT start with a number, or have spaces in it
Use your custom ID in a menu link
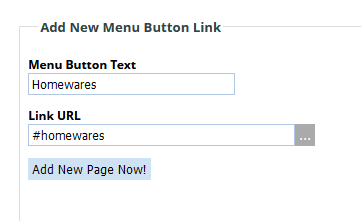
Add a new menu link page type to the page with a # tag at the start.
E.g. for our homewares example, this would be #homewares
Using a menu link on a multiple page site
Having a menu link that jumps you down the page works for a one-page site, but is more challenging for a multi-page site.
To link to a section on the homepage
Add a new menu link page type to the homepage section with both a / character and a # tag at the start.
E.g. for our homewares example, this would be /#homewares
This will tell the browser to go to the homepage, then to the section
To link to a custom page
Add a new menu link page type to another page with the page URL, then a # tag with the ID name
E.g. for our homewares example residing on a /products page , this would be /products#homewares or /products.html#homewares if using a filename with an .html extension.
This will tell the browser to go to the custom page, then to the section
Adding javascript to slide to a link on a multiple page site
If you are comfortable using javascript you can use the following code as a starting point for animating your movement down the page when a menu button is clicked.
This code assumes you are putting a back / in front of any link e.g. /#example. This code is an example only and there is no warranty for its use on your website.
$(document).ready(function() {
$('#menu a[href*="#"]:not([href="#"])').click(function() {
var target = $(this.hash)
target = target.length ? target : $('[name=' + this.hash.slice(1) +']')
if (target.length) {
$('html,body').animate({
scrollTop: target.offset().top
}, 1000);
return false;
}
});
});
More From This Section
FAQ Topics
Building your site
Advanced Page Types
E-Commerce
- Shopping Basics
- Product Pricing, Currencies
- Category Management
- Products
- Product Options
- Layout and Formatting
- Payment Options
- Freight - Couriers
- Processing Orders
- Orders / Invoices
- Advanced Ecommerce
- Plugins
- Wholesale
- Bookings Management System
- Stock & Quantities
- Vouchers, Discounts, Loyalty Points
- Selling Photos / Prints
- Shopping Cart Add-on Page types
- Advanced APIs / Add ons
- Point of Sale (POS)
- Reports
Email & Membership
Promoting your site
Advanced
- Power User Options
- Form Spam Filtering
- Wordpress
- PHP Setup
- [TAGS]
- jQuery snippets
- Search External Links / Import external content
- HTML / CSS Snippets
- Embedding Web Fonts
- Loading additional Material Symbols styles
- FAQ Help Map
- Uploading local font files
- Advanced Template Customisation, CSS, etc
- Languages and Translations
- Importing Content from Another Platform