How to add a voucher as a product
1. E-commerce
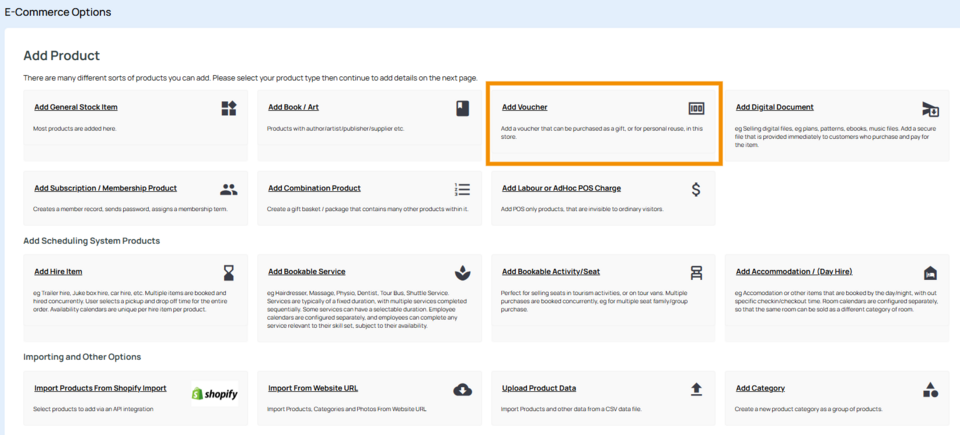
2. Add New Product
3. Add Voucher
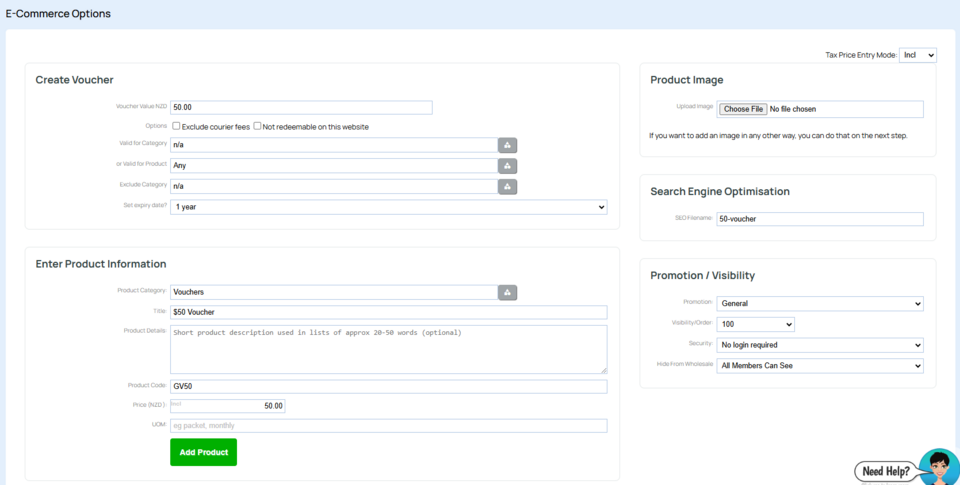
4. Enter Voucher Value e.g. $50.00
5. Set an expiry date if wanted, and add any other filters. Leave filters blank if you wish the amount to be used on any product throughout the website.
6. Enter your title, code and price. (price would usually match the voucher amount)
7. Press Add Product.
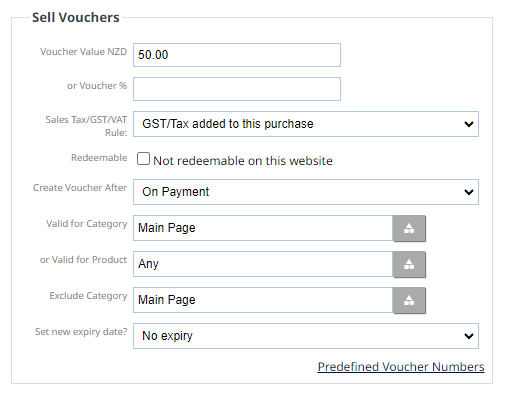
You can then edit the product. Under the Automation tab you will find more options as below:
代金券
You can enter a fixed voucher value or a percentage of total order (excludes shipping and taxes)
Vouchers are normally sold NILL GST, but a voucher given with a product will incur GST. When a voucher is used, tax will be calculated on the items purchased. You won't want to pay GST twice. However, those on cash basis GST will likely pay GST based on the amounts actually received with each order.
You can also limit the voucher purchases to specific category or product. Note that sub categories of selected category are ignored, and selecting the top level category is meaningless.
On successful payment call-back (or after specified time), the voucher will be sent to the customer by email on the set "Create Voucher After" date. All vouchers will appear in a single email. Each with a unique random 8 digit code, and containing the title and description of this product.
All vouchers will be automatically loaded onto this shopping cart for future use. If these vouchers are destined to be used offline, then you need to mark the vouchers as in-store.
Vouchers can be printed manually in the order management area if needed.
Automation Options
These special automated service delivery options are available after an order has completed fully including payment by credit card merchant account or Paypal or similar 3rd party credit card gateway supporting a dependable and trustworthy callback/return/instant notification method.
More From This Section
FAQ Topics
The Basics
Building your site
- Pages
- Content Editor Modes Explained
- - DRAG DROP Editor (Default)
- - CONTENTBOX Editor (Advanced)
- - WORD STYLE Editor (TinyMCE)
- - LIVE Editor (Click to Edit Mode)
- Styling Content
- Images / Backgrounds
- Banners and Sliders
- Uploading content
- Design Templates
- Forms
- More Q & A
- Menus
- Mobile Styling and Optimisation
Advanced Page Types
E-Commerce
- Shopping Basics
- Product Pricing, Currencies
- Category Management
- 产品
- Product Options
- Layout and Formatting
- 付款方式
- Freight - Couriers
- Processing Orders
- Orders / Invoices
- Advanced Ecommerce
- Plugins
- Wholesale
- Bookings Management System
- Stock & Quantities
- Vouchers, Discounts, Loyalty Points
- Selling Photos / Prints
- Shopping Cart Add-on Page types
- Advanced APIs / Add ons
- 销售点(POS)
- Reports
Email & Membership
- Member Management
- Members Pages / Template Customisations
- From Addresses and Reply To Email Notifications
- Global Enquiry form options
- Standard Field Names
- Webmail
- Bulk Email
- CRM Features
- Email Campaigns
- Forums & Blogs
- Pop3/Imap Email Services
- Scams and Hoaxes
- Lead Magnets / Growing Your Customer Database
Promoting your site
Advanced
- Power User Options
- Form Spam Filtering
- Wordpress
- PHP Setup
- [TAGS]
- jQuery snippets
- Search External Links / Import external content
- HTML / CSS Snippets
- Embedding Web Fonts
- Loading additional Material Symbols styles
- FAQ Help Map
- Uploading local font files
- Advanced Template Customisation, CSS, etc
- Languages and Translations
- Importing Content from Another Platform