Restricting who can view an existing page:
To restrict a page, edit the relevant page and click the SECURITY tab as indicated below:
 .
.
Restricting access via Member Status / Authorisation level
To restrict access, click the Page Privacy by Member Status drop down and select the type of protection you require.

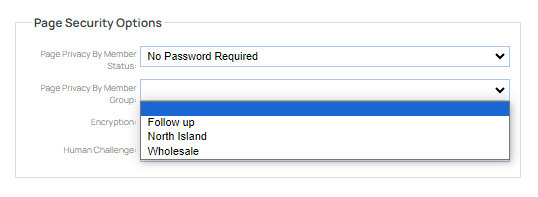
Restricting access via Member Group
If you have set up Member Groups in the MEMBERS area, and have assigned members to them, you can also choose to restrict to a Member Group and other settings via the Page Privacy by Member Group option.
Giving Users Access to Restricted Pages
To give a user access to a password protected page, then you will need to create the member in the MEMBERS area,
Click the main MEMBER menu button, then choose Add Member from the options available.

If the user already exists - update their Status / Authorisation level, or assign to a Member Group as required.
If the user already exists, and you have restricted by Authorisation Level - then you need to select them and increase their security level to "Authorised User".
You can choose other access levels as appropriate. They must be higher than the security level set for the page. You can increase the password protection level for any page under page options tab, top right when editing page.
If you have restricted the page by Member Group, you will need to assign them to the relevant Member Group options. These can be found under the NEW GROUPS section on the right-hand side of the member record.
Notes on Definitions
- Password protected means you have set either a security group or security level for the page. These pages will be included in menus if not hidden. If hidden from menu, then it may appear in member welcome page. If you have set a security group, and hidden the page, then you need to ensure the security level is also set, otherwise it will not appear on member welcome page.
More From This Section
FAQ Topics
Building your site
- Pages
- Content Editor Modes Explained
- - DRAG DROP Editor (Default)
- - CONTENTBOX Editor (Advanced)
- - WORD STYLE Editor (TinyMCE)
- - LIVE Editor (Click to Edit Mode)
- Styling Content
- Images / Backgrounds
- Banners and Sliders
- Uploading content
- Design Templates
- Forms
- More Q & A
- Menus
- Mobile Styling and Optimisation
Advanced Page Types
E-Commerce
- Shopping Basics
- Product Pricing, Currencies
- Category Management
- Ngā Hua
- Product Options
- Layout and Formatting
- Ngā Kōwhiringa Utu
- Freight - Couriers
- Processing Orders
- Orders / Invoices
- Advanced Ecommerce
- Plugins
- Wholesale
- Bookings Management System
- Stock & Quantities
- Vouchers, Discounts, Loyalty Points
- Selling Photos / Prints
- Shopping Cart Add-on Page types
- Advanced APIs / Add ons
- Te Wāhi Hoko (POS)
- Reports
Email & Membership
- Member Management
- Members Pages / Template Customisations
- From Addresses and Reply To Email Notifications
- Global Enquiry form options
- Standard Field Names
- Webmail
- Bulk Email
- CRM Features
- Email Campaigns
- Forums & Blogs
- Pop3/Imap Email Services
- Scams and Hoaxes
- Lead Magnets / Growing Your Customer Database
Promoting your site
Advanced
- Power User Options
- Form Spam Filtering
- Wordpress
- PHP Setup
- [TAGS]
- jQuery snippets
- Search External Links / Import external content
- HTML / CSS Snippets
- Embedding Web Fonts
- Loading additional Material Symbols styles
- FAQ Help Map
- Uploading local font files
- Advanced Template Customisation, CSS, etc
- Languages and Translations
- Importing Content from Another Platform