- Utilizza la procedura guidata di configurazione per creare un sito web di prova.
- aggiungere, rimuovere e rinominare le pagine del tuo sito web di prova
- aggiungere titoli di pagina, sottotitoli e testo dei paragrafi a una pagina web
- aggiungere un'immagine a una pagina web
- aggiungi un logo al tuo sito web di prova
Utilizza la procedura guidata di configurazione per creare un sito Web di prova.
Registrati per una prova gratuita del sito web tramite:
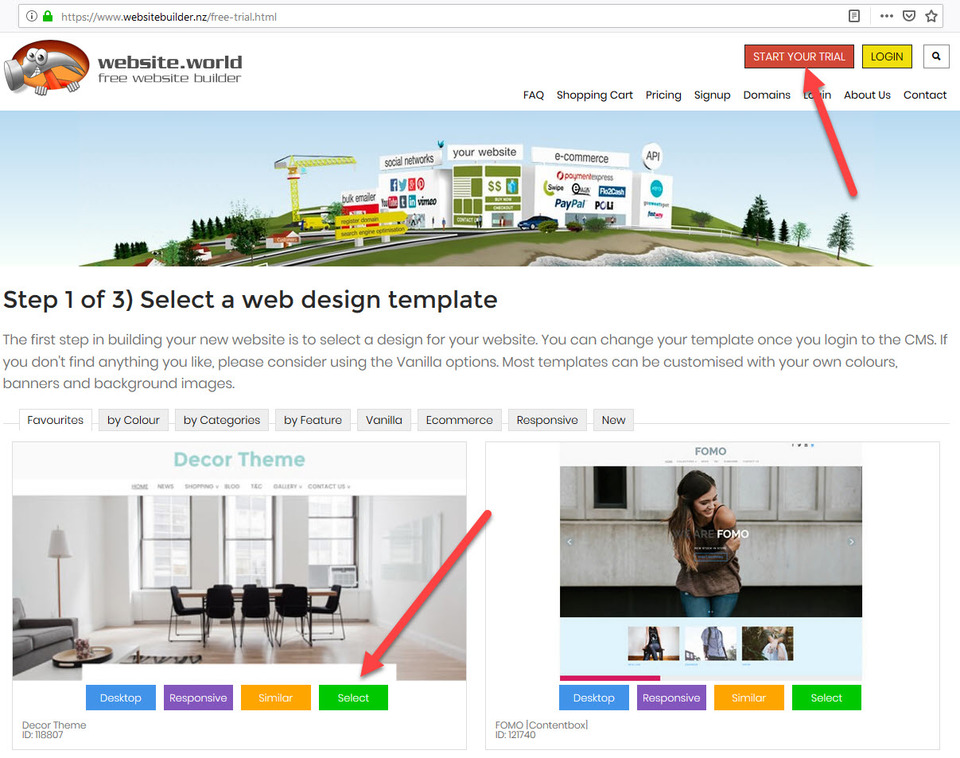
- Facendo clic sul pulsante Inizia la tua prova
- Cliccando sul pulsante Seleziona nel template del sito web Decor Theme (puoi selezionare un altro tema se preferisci, tieni presente che durante il corso useremo il template Decor Theme)
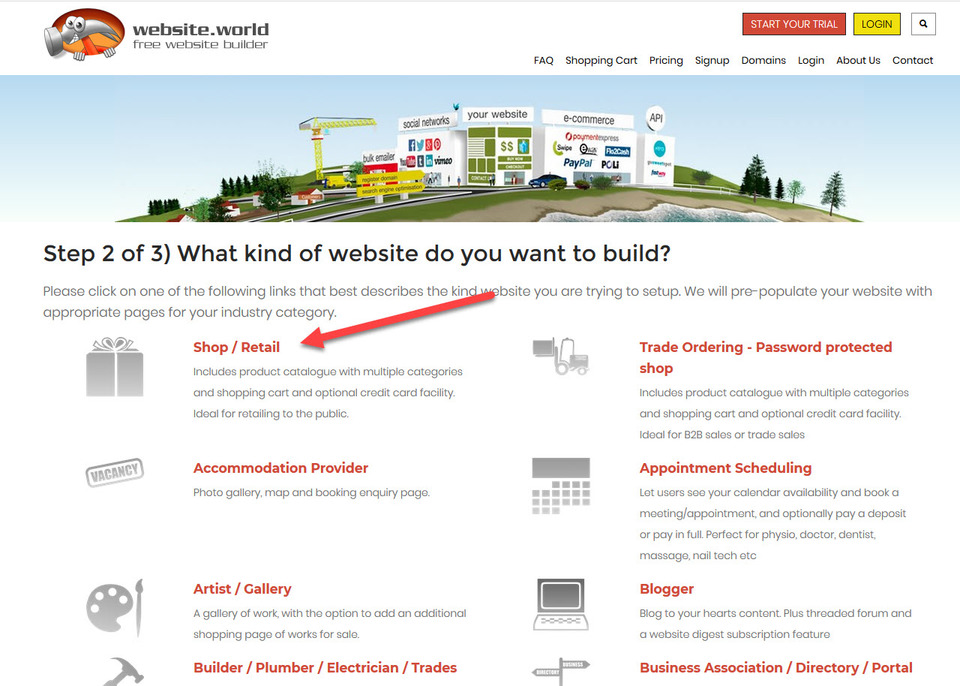
Successivamente dovrai selezionare il tipo di sito web, che ai fini di questo corso dovrà essere l'opzione Negozio/Vendita al dettaglio.
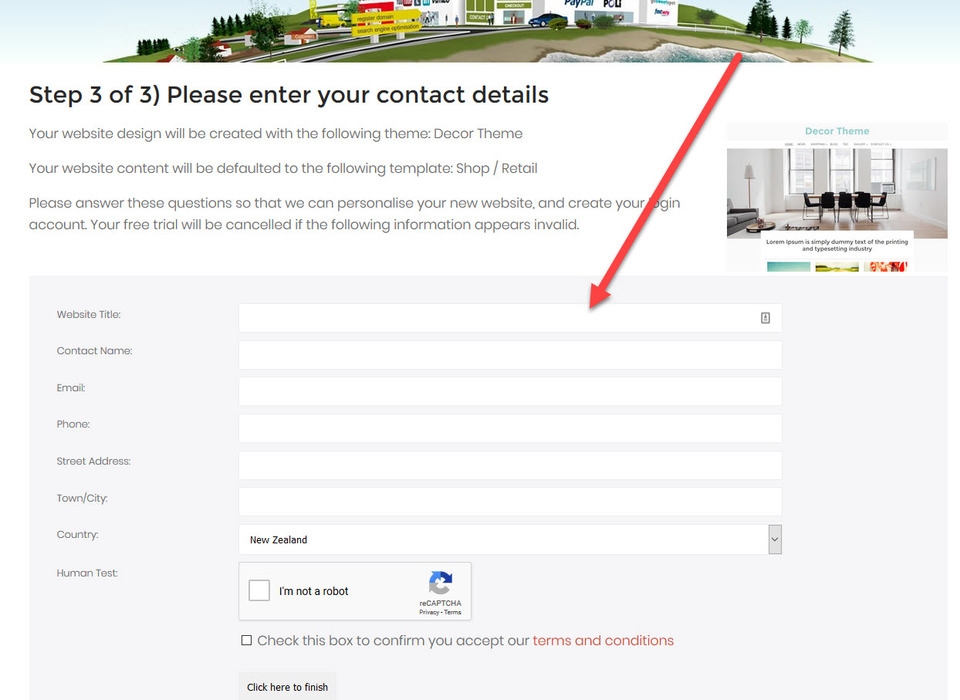
Successivamente dovrai inserire i tuoi dati di contatto e il nome del tuo sito web. Per questo corso, useremo il nome My T-Shirt Shop.
Riceverai ora un'email da Website World contenente i dati di accesso e una password temporanea per il tuo sito web di prova. Dopo aver inserito la password temporanea, verrai reindirizzato alla pagina di benvenuto all'interno del CMS (sistema di gestione dei contenuti). Qui potrai modificare e progettare il tuo nuovo sito web.
Il template e la tipologia di sito web che abbiamo scelto hanno comportato l'aggiunta automatica di alcune pagine come pagine di esempio. Poiché il sito non è ancora online, potrai aggiungere, rimuovere o rinominare le pagine senza subire penalizzazioni da parte dei motori di ricerca (cosa che potrebbe accadere se il sito fosse attivo).
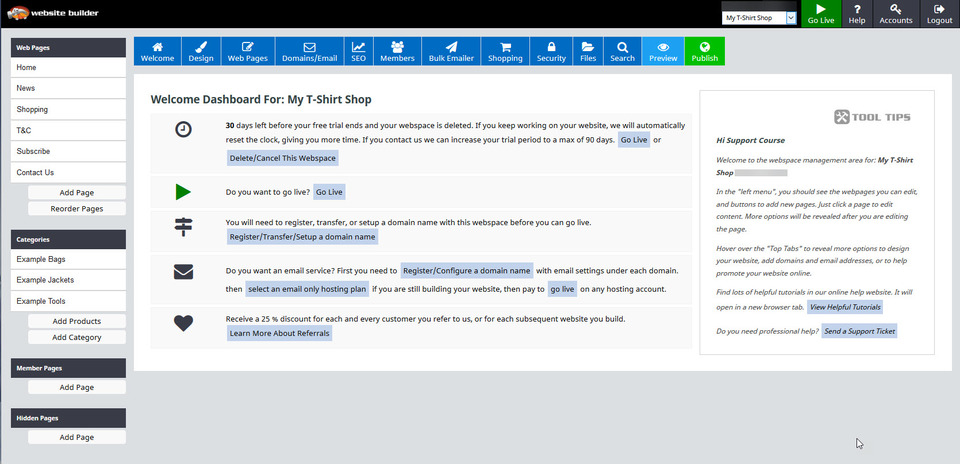
Aggiungere, rimuovere e rinominare pagine web
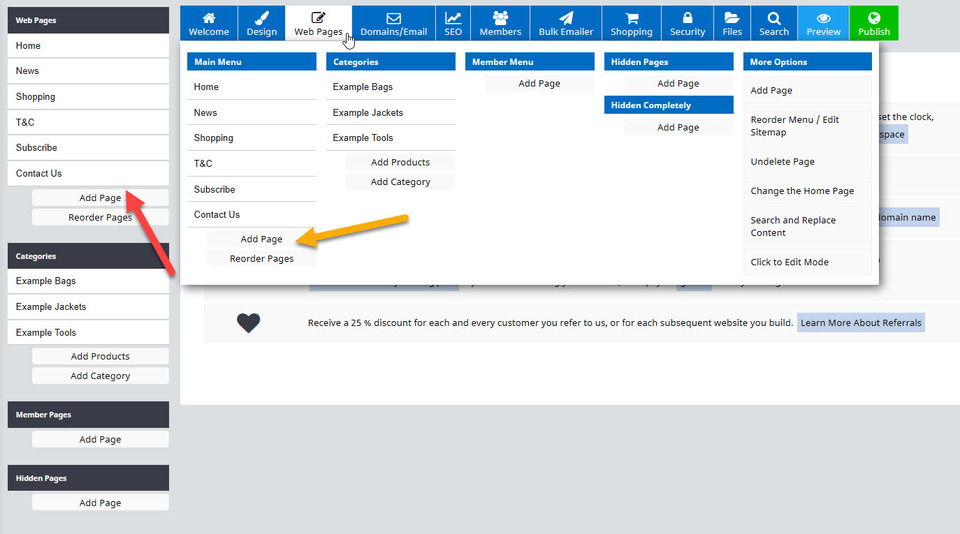
Per aggiungere una nuova pagina al tuo sito web, fai clic sul pulsante "Aggiungi pagina" sul lato sinistro dello schermo (freccia rossa) oppure, dal menu a tendina della scheda "Pagine web", seleziona il pulsante "Aggiungi pagina" (freccia gialla).
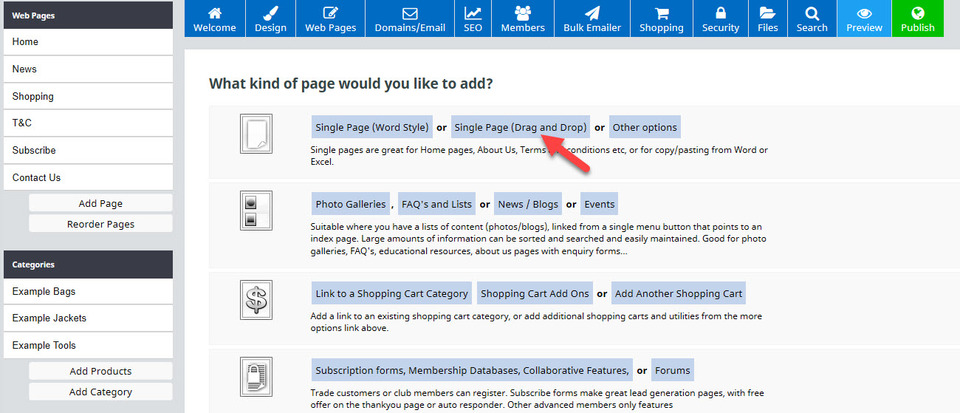
In una nuova schermata, ti verrà chiesto che tipo di pagina desideri aggiungere. Ai fini di questo corso, aggiungeremo una pagina singola (trascina e rilascia).
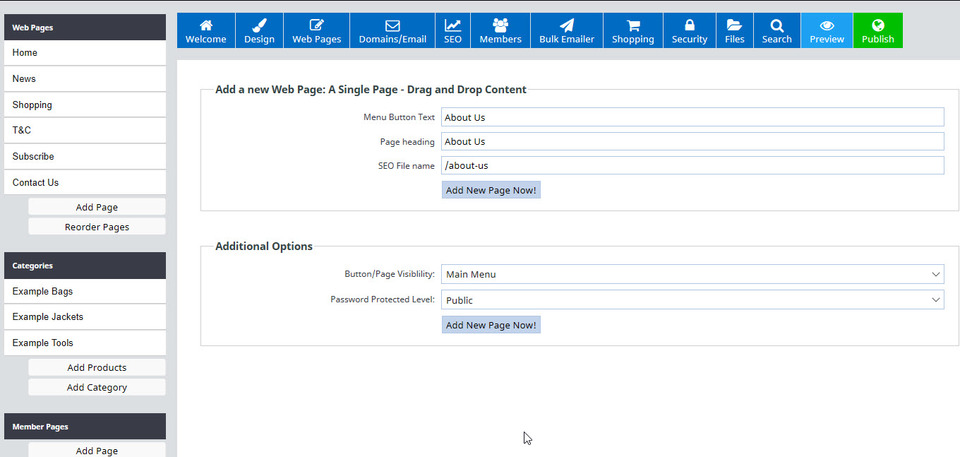
Dopo aver cliccato sul pulsante "Aggiungi nuova pagina ora!", verrai reindirizzato alla tua nuova pagina "Chi siamo". Questa verrà inoltre automaticamente aggiunta al menu visualizzato sul lato sinistro dello schermo, nonché alla barra dei menu del tuo sito web.
Eliminare completamente una pagina da un sito web non è consigliabile per motivi di SEO. È preferibile, invece, modificarne la visibilità per impedirne l'indicizzazione e la visualizzazione, e rimuoverla dal menu. Se proprio si deve eliminare la pagina, assicurarsi di reindirizzare il suo URL a una pagina attiva.
Trattandosi di un sito di prova, quale è attualmente il tuo sito web, puoi tranquillamente rimuovere una pagina ed eliminarla. Per farlo, clicca sul pulsante "Pagine Web", che aprirà una mappa del sito con l'elenco di tutte le pagine attualmente presenti. In questo esempio, elimineremo la pagina "Iscriviti". Per prima cosa, clicca sull'icona a forma di ingranaggio (freccia rossa).
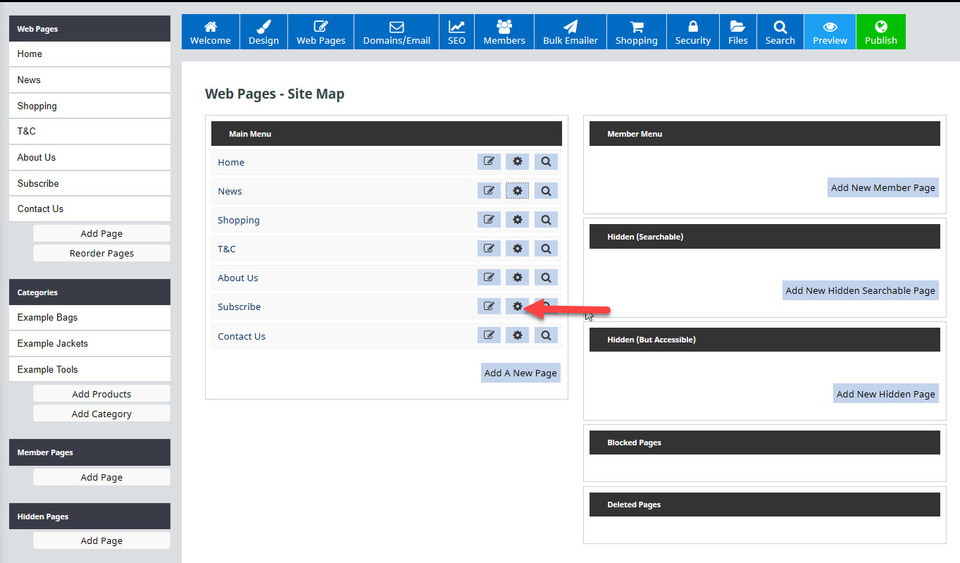
Si aprirà una schermata con diverse opzioni per questa pagina. Seleziona l'opzione "Elimina questa pagina". Comparirà un messaggio di avviso. Fai clic sul pulsante "Elimina pagina ora", quindi chiudi la schermata facendo clic sulla X nell'angolo.
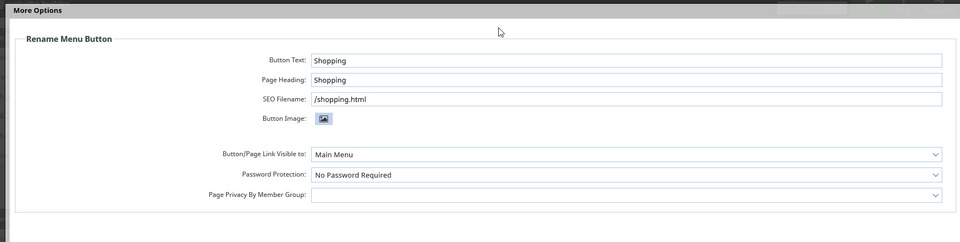
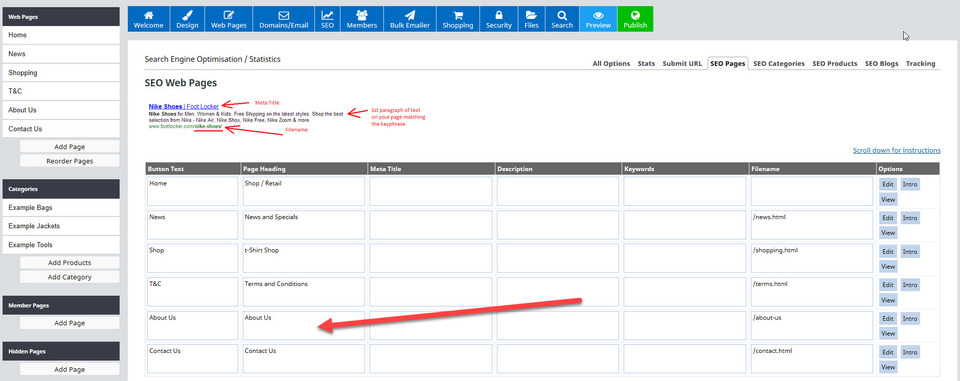
Anche la ridenominazione di una pagina si effettua tramite la mappa del sito. Clicca sul pulsante "Pagine web" e seleziona l'icona a forma di ingranaggio della pagina "Shopping". Le aree da modificare sono il testo del pulsante, l'intestazione della pagina e il nome del file SEO. Tieni presente che, una volta che il tuo sito web è online, non dovresti modificare il nome del file SEO, poiché ciò creerebbe link interrotti e i motori di ricerca lo interpreterebbero come una nuova pagina, dato il nuovo nome. Di conseguenza, perderesti tutti i vantaggi SEO che la pagina aveva in precedenza. Puoi modificare i nomi dei file senza penalità se il tuo sito è ancora in modalità di prova.
Ai fini di questo corso, modificheremo il testo del pulsante da "Shopping" a "Shop" e l'intestazione della pagina da "Shopping" a "T-Shirt Shop".
Aggiungi titoli di pagina, sottotitoli e testo dei paragrafi a una pagina
Per modificare una pagina e aggiungere titoli, intestazioni e testo dei paragrafi, fai clic sul nome della pagina nella scheda Pagine Web sul lato sinistro dello schermo. Si aprirà così la pagina da modificare. In questo esempio, modificheremo la pagina Chi siamo, come mostrato di seguito, utilizzando l'editor drag-and-drop di Innova Studio.
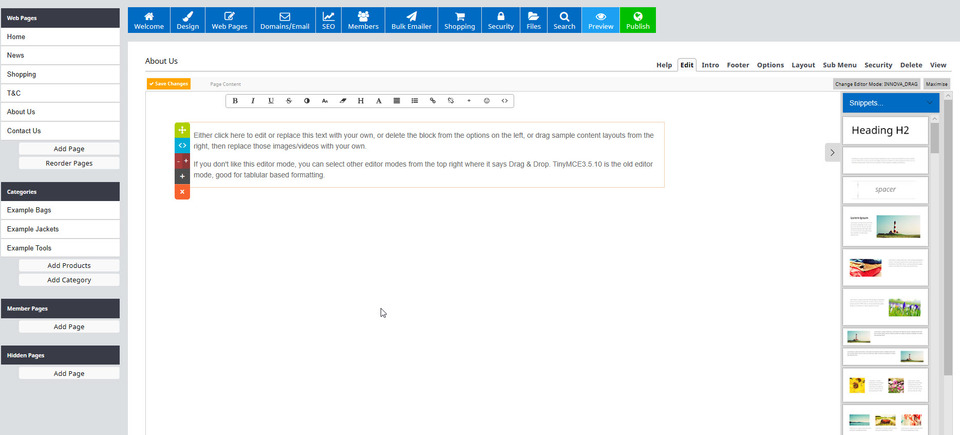
Ora che la pagina "Chi siamo" è aperta, possiamo aggiungere sottotitoli e testo per i paragrafi. Puoi farlo cliccando all'interno della casella di testo del paragrafo, che si trova già al centro della pagina per impostazione predefinita, oppure selezionando un frammento di testo dalla colonna di destra che contiene il tipo di testo desiderato.
Ecco il link al testo che abbiamo utilizzato, che potete scaricare e copiare e incollare (Ctrl+V) nel vostro sito di prova, se necessario.
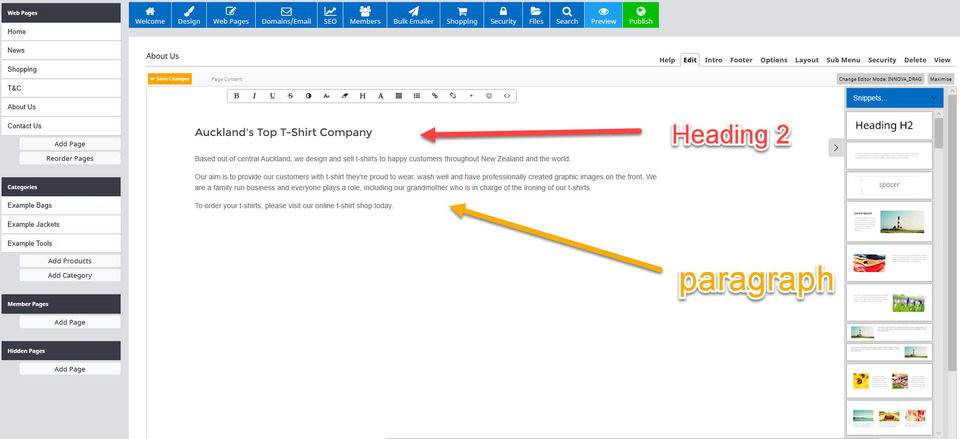
Abbiamo aggiunto del testo al riquadro di paragrafo esistente, quindi abbiamo cliccato e trascinato sul riquadro di intestazione H2 sopra di esso. Abbiamo poi aggiunto un titolo a questo riquadro di intestazione, come mostrato in questa immagine:
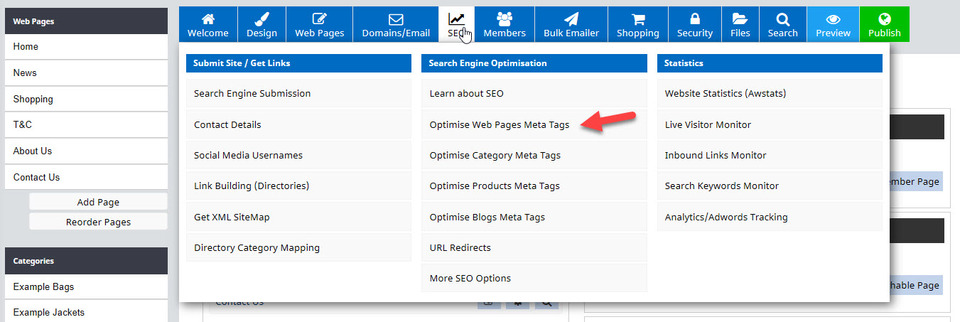
Si aprirà quindi una pagina da cui potrai modificare i tuoi meta tag SEO, incluso il titolo della pagina (intestazione della pagina). Per ora lo lasceremo così: Chi siamo.
Caricare e aggiungere un'immagine a una pagina web
Riapri la pagina "Chi siamo" cliccando sul suo titolo, che si trova nella colonna "Pagine web" sul lato sinistro dello schermo.
Esistono due modi per aggiungere un'immagine a una pagina. Il metodo da utilizzare dipenderà dall'immagine stessa che si desidera inserire.
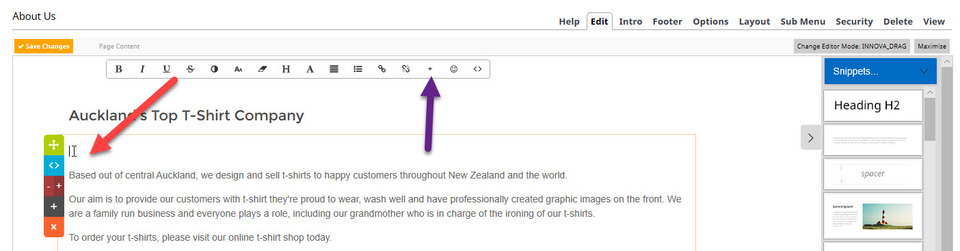
- Per inserire un'immagine in un blocco di testo esistente, posiziona il cursore nel punto in cui desideri inserire l'immagine (freccia rossa), quindi fai clic sul segno + nella barra di modifica (freccia viola). Tieni presente che se posizioni il cursore accanto al testo, la posizione del testo verrà modificata. Se desideri che l'immagine sia accanto al testo, è consigliabile utilizzare una casella di snippet: questa aprirà una finestra che ti chiederà cosa desideri inserire (immagine, link o campo modulo), quindi scegli Inserisci immagine. Per caricare un'immagine dal tuo dispositivo, fai clic sul pulsante Sfoglia per aprire i file immagine sul tuo dispositivo, fai doppio clic sull'immagine (è preferibile un file JPEG) e quindi fai clic sul pulsante blu Carica.
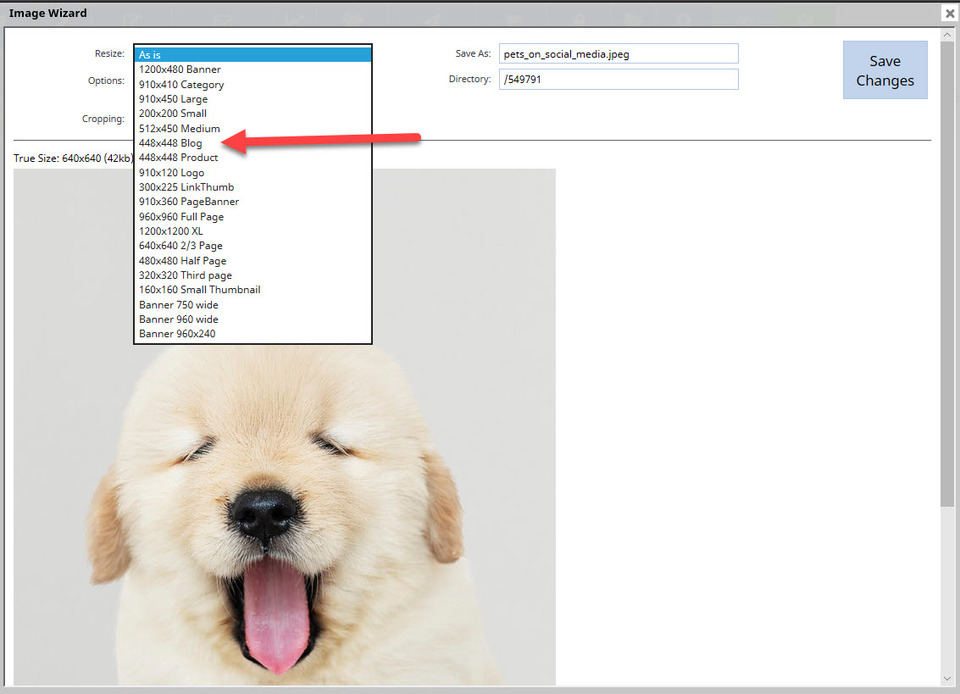
La procedura guidata per le immagini nel CMS aprirà l'immagine, rendendola pronta per la modifica, se necessario. Mostrerà le dimensioni reali dell'immagine, il nome del file esistente e alcune opzioni per ritagliare, ruotare, ridimensionare e convertire in JPG. Ridimensioneremo questa immagine per adattarla alla pagina Chi siamo. Fai clic sulla freccia a discesa accanto alla casella Ridimensiona e seleziona l'opzione "Dimensioni immagine 448x448 Blog". Modifica il nome del file se necessario, quindi fai clic su Salva modifiche.
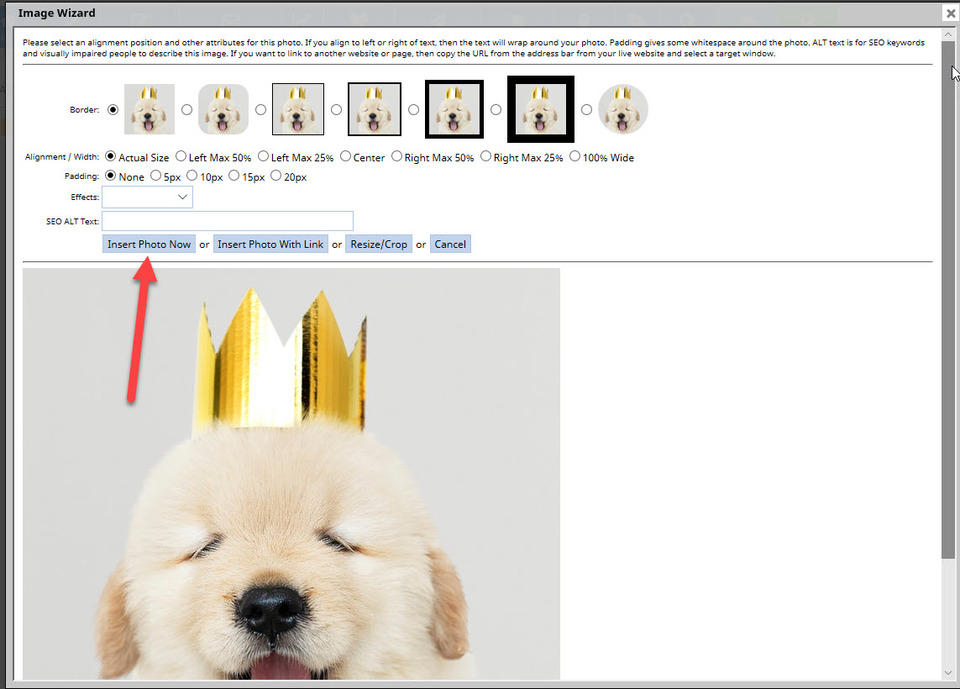
Si aprirà un'altra finestra che offre alcune opzioni di modifica per l'immagine, tra cui la posizione, il bordo e la spaziatura intorno all'immagine. Per questo esempio, utilizzeremo il bordo, l'allineamento e la spaziatura predefiniti, quindi faremo clic sul pulsante blu "Inserisci foto ora".
La pagina "Chi siamo" ora apparirà così nell'area di modifica del CMS:
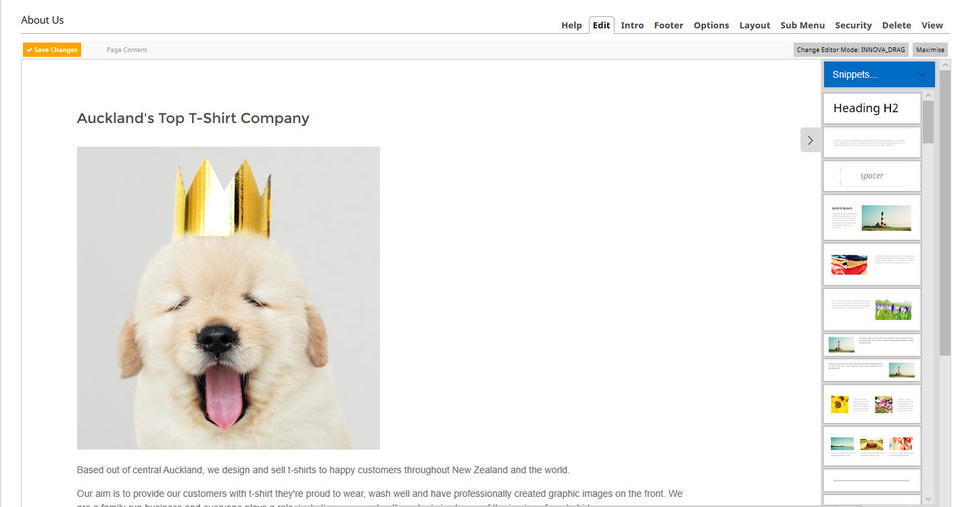
Approfondiremo ulteriormente le tecniche di fotoritocco nelle sezioni successive del corso.
Aggiungere un logo al tuo sito web
Uno dei modi migliori per personalizzare il tuo sito web è aggiungere il logo aziendale. Passa il mouse sopra il pulsante "Design" nel menu, quindi scegli l'opzione "Immagini di sfondo" o "Logo".
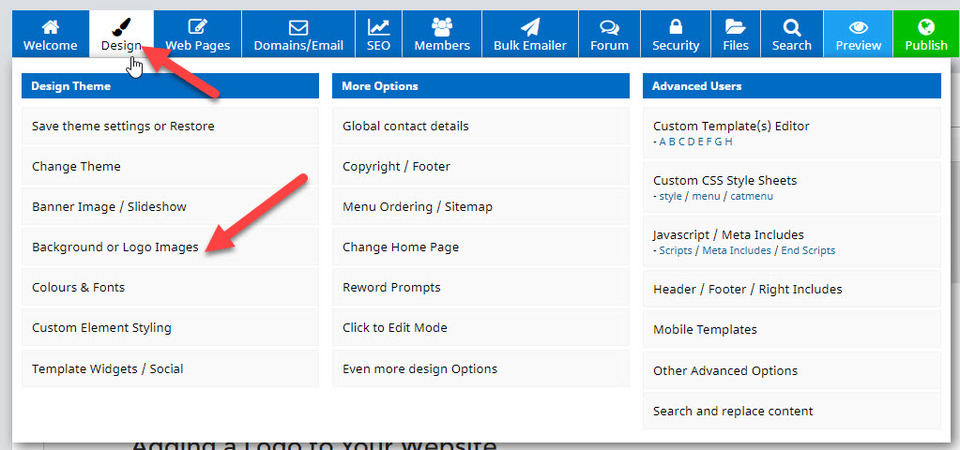
Nella pagina Opzioni di progettazione che si apre, vedrai che il logo testuale (nome del sito web) viene visualizzato di default. Lo sostituiremo con un'immagine del logo. Fai clic sull'icona dell'immagine (cambia immagine) per aggiungere il tuo logo.
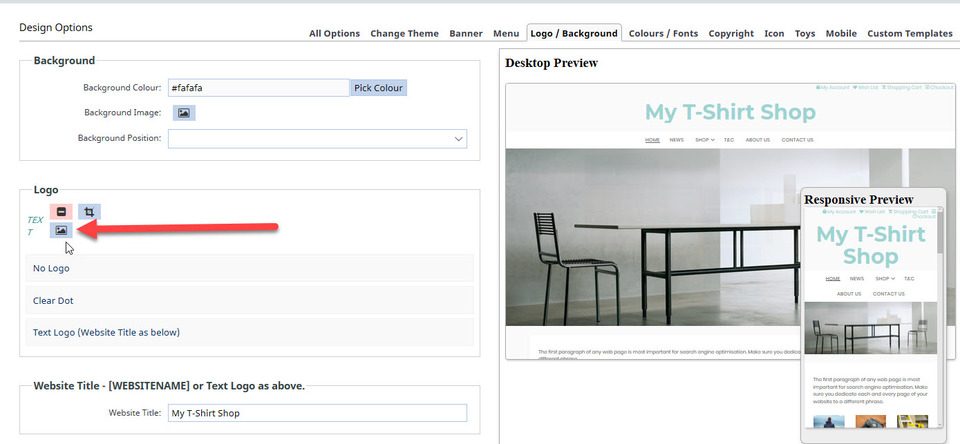
Verrai nuovamente indirizzato alla procedura guidata per le immagini, dove potrai sfogliare e caricare un'immagine dal tuo dispositivo (è preferibile che il tuo logo abbia già le dimensioni richieste, ovvero 910x120 pixel). Questa volta, seleziona l'opzione "Logo" dal menu a tendina "Ridimensiona" - "Logo 910x120". Il tuo logo verrà automaticamente posizionato dove prima compariva il nome del sito web, sopra il menu. Premi "Pubblica" per salvare il lavoro svolto finora.
Hai completato la Sezione 1 del Corso per Principianti. Ben fatto! Ora è il momento di passare alla Sezione Principianti 2.